
The links below will take you to subsections of this chapter.
Plan Number 1 - General directions
Plan Number 2 - Canvas lining
Plan Number 3 - Galvanized sheet metal lining
Plan Number 4 - A Mikveh disguised as furniture
Plan Number 5 - A collapsible, flexible, folding Mikveh
Plan Number 6 - Utilizing closet space for a Mikveh
Plan Number 7 - Permanent, ornamented Mikvehs
Plan Number 8 - Suggestions for more permanent Mikvehs
The figure below shows a sincere Jew installing his own Mikvah at the cost of a few dollars and a few hours' labor, while the community is planning for a Mikvah, debating, raising funds, battling imaginary problems, and defeating the principle by delay.
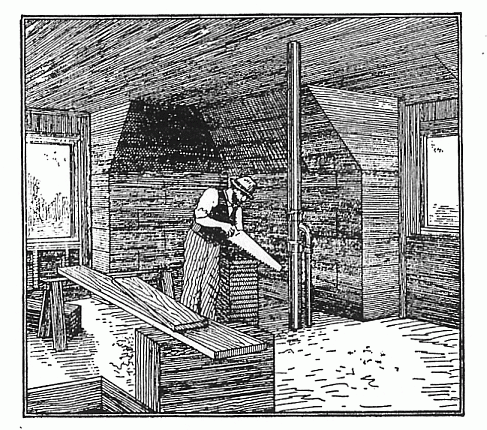
Figure 1
1. For the convenience of observant Jews, we hereby show how a Mikvah can be installed in different ways in any house. Please be aware also that when referring here to the installation of a Mikvah, we mean both for private family and for public use. There is no essential difference between the construction of a public Mikvah and a private one, except for certain conveniences which a public Mikvah may require to suit the conditions, according to the volume of patronage.
2. One does not necessarily have to own a home to have a Mikvah of his own. Usually wherever there are accommodations for a family to live there are facilities for a Mikvah.
3. No special mechanic or plumber is needed, unless one desires to give the Mikvah a particularly mechanical finish or ornamental appearance.
4. A Mikvah does not necessarily have to be installed at the time of construction of the building, nor is it necessary to have it in the ground. It can be installed at any time, in any building, or in any room of the building.
5. It does not require any alteration or remodeling, nor does it in any way interfere with the building, save for a few light nails or a screw in the floor. The making of a Mikvah is as simple as any ordinary light repair around the house.
6. All the construction of a Mikvah consists of is:
(a) To make a kind of receptacle with a capacity of a little over the required 24 cubic feet of water. The simplest way is to construct a wooden frame the shape of a box, of any desired form, with no bottom of its own, the floor of the building serving as the bottom of the Mikvah.
(b) A lining to hold water. This lining can be made of roofing paper, canvas, or, for permanency, galvanized sheet metal.
(c) An outlet at the bottom may be provided for occasional change of water.
(d) Ordinary house water, hot or cold, can be used to fill the Mikvah.
Consult the chapter, "Fundamental Rules of Mikvah" (Chapter 17):
See Sec. IV for calculation of proportions, size and form;
See Sec. V, in regard to a ready-made receptacle;
See Sec. II, Paragraph 3 (e), for the quality of the water;
See this chapter, Paragraphs 48 to 51 (below) for how to move and re-install the Mikvah.
This is a summary, in brief, of the whole matter. The rest of this chapter is more or less detailed explanations and helpful suggestions.
Plan Number 1 - cost within $5.00
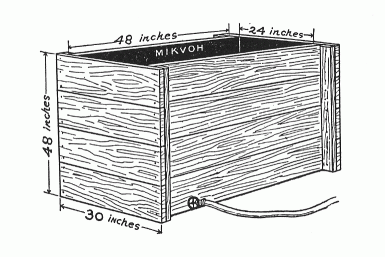
Figure 2. A simple home-made Mikvah. It costs
less than $5.00. It answers the financial question;
solves almost all problems. It challenges the
loyalty and the sincerity of a Jew.
7. For people who are not mechanically inclined, or to whom the cost is an issue, we shall describe in detail how a proper (Kosher) Mikvah can be simply installed and at a cost of less than five dollars, a price which almost anyone can afford. (Note: The author is an authority on building construction. The plans in this work were carefully considered by him. They have been tried and tested, and proved practicable and dependable.
8. For illustration, we shall take as our Mikvah a box measuring 24 inches wide, by 48 inches long, by 48 inches deep, (48"x24"x48", inside measurement). The table below shows the material needed for this project.
For the frame

Item a.  8 pieces    1" stock, 12" wide, 30" long (1" x 12" x 2'6")
Item b.  4 pieces    1"         2"       48"      (1" x 2" x 4')
Item c.  8 pieces    1"        12"       48"      (1" x 12" x 4')
Item d.  2 pieces    1"         6"       48"      (1" x 6" x 4')

         Total 59 feet at a cost of about 3 cents per foot .............. $1.77

Item e.  A box of 6-penny nails .........................................   .10

For the lining

Item f.  72 ft of roofing paper costing about $2 for a roll of 100 ft ...  1.44

For the outlet

Item g.  1 1/2 inch hydrant bib faucet ..................................   .50
Item h.  1 1/2 inch by 3 inch all-threaded galvanized (tank) nipple .....   .10
Item i.  2 1/2 inch lock nuts and 2 fiber washers .......................   .10
Item j.  1 1/2 inch sleeve or coupling ..................................   .15

         Total .......................................................... $4.16
         Add 10% for unforseen expenses or variation in prices ..........   .42
         Total .......................................................... $4.58
Our comment: These are 1930 prices, and obviously one would pay at least an order of magnitude more nowadays. But you get the idea: it's very inexpensive. It would be hard to claim that building a mikveh is out of reach on account of cost.
9. The eight short boards (Item a) serve as the two ends for the frame, four for each end; each of the boards being 12" wide by 30" long, when four are put side by side they will form the required dimension of 30" by 48". The four narrow strips, (Item b) serve to tie these boards, as hereinafter explained.
10. The eight long boards (Item c) serve as the two sides, making them each 48" by 48". The two narrow boards (Item d) serve to bind, reinforce, the sides.
11. You will notice that the ends are 30" wide - six inches wider than the inside measurement of the frame. Four inches of this width is taken up by the two 2" strips (b), which are nailed at the ends of the boards (a), to hold them together, and to which the side boards (c) are to be nailed, as hereinafter explained; and an additional two inches is allowed for the thickness of the side boards, thus accounting for the six inches difference in width.
12. Now, take four of the short boards (Item a), lay them side by side, making a dimension of 30"x48"; nail one of the pieces (Item b) on each end of the boards, close to the edge, flush and straight with the outside edge (doing the same with the remaining four short boards and the other two narrow pieces) ; thus forming two panels, to serve as the ends of the frame to hold the sides. These ends or panels are now 26" wide inside between the strips, and in all 30" outside measurement, as illustrated in the figure below.
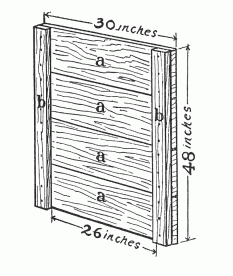
Figure 3. An end panel
13. Now, take the eight long boards (Item c), one at a time, and nail the end of the board to the panels or ends shown above, inside of the strips, and to the strips (b) ; that is, drive the nails from the inside diagonally into the board, strip and end-panel.
14. Then take the two narrow boards 1" x 6" x 48" (Item d) and nail one on each of the sides (c) of the Mikvah frame, in the middle, on the outside, in an upright position (as shown in the drawing below), for the purpose of reinforcing, binding the four boards together, thus strengthening them to resist springing or bending from the pressure of the water when the Mikvah is filled. This makes the four walls of the frame.
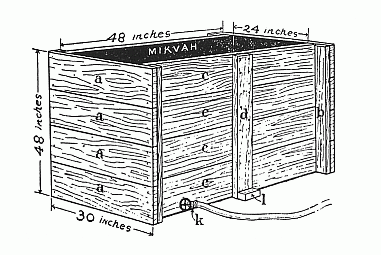
Figure 4. A complete Mikvah frame
15. Drive all nails a little on an angle so that they will hold better; and this also may save clinching. Nails are to be about three inches apart. When nailing the 2" strips (b) to the ends, they should be nailed again from the back, i.e., from the other side, or light screws be used, to make those ends doubly strong.
16. Bore a 7/8" hole in any one of the bottom boards (a) or (c) of the frame, about one inch from the edge of the board to the center of the hole, to provide for an outlet (k), as hereinafter explained. Now set the frame permanently in its proper place.
17. The floor of the room or building forms the bottom of the Mikvah frame; that is, of course, when the Mikvah is installed on the surface of the ftoor. Also, when convenient, it is still better to make use of a wall or a corner of a room or building to make up the frame. In this case nail solidly on the walls an upright strip to support the ends of the Mikvah wall, which ends are to be nailed to it from the inside of the strip. This - making use of the floor or/and the wall of the building - is more in conformity with the laws governing Mikvah, as well as a saving of material.
18. If possible, toe-nail the frame slightly to the floor. In any event, toe-nail the bottom ends of the two narrow upright boards (d) to the floor. To make sure, nail in addition, a couple of small blocks (l) about an inch thick on the floor at the bottom of those uprights, as illustrated in the figure, to prevent spreading of the side walls from the weight of the water, and to prevent breaking of the lining of the Mikvah.
19. In case of a concrete or tile floor, into which nails cannot be driven, the construction is proper without nailing the frame to the floor (as explained hereinafter in Paragraph 29, but a band or brace of sheet metal should be provided at the bottom to keep the sides from spreading. (Note: It is adviable to always have such a bracing on either side whenever the span exceeds thirty inches.) In order that the brace shall not interfere with the bottom lining, it is best to make the brace of a strip of galvanized sheet metal, about 16 gauge, 6" x 36". Fix the brace across the bottom of the frame, allowing a margin of about five or six inches to project on the outside at each end; these projections, having punctured or drilled holes, to be bent upwards embracing the sides at the bottom, and nailed or screwed to the upright pieces (d). In order to have an even surface for the lining at the bottom of the frame, some padding, as paper or cardboard, the thickness of the brace, should be put on the floor on each side of the brace. This completes the frame work.
20. As already mentioned twelve Inches in height are allowed in each dimension for the rise of the water when a person immerses, and to prevent splashing. These twelve inches are approximate. Therefore, should it be found more practicable, in order to suit the trade measurement of materials, to have the frame a little less In height, an inch or so, it does not matter, as long as there is plenty of allowance for the overflow and splash of the water. However, it must be borne in mind that the cubic measurement, the quantity of water, must under no conditions be less than the required twenty-four cubic feet.
The Lining
21. Now, we are ready for the lining; that is, to make the Mikvah hold water. Ordinary roofing paper (Item f) can be used for saving in cost, or for temporary purposes, if carefully handled.
Note: The difference between a temporary Mikvah, which costs less than $5.00, and a permanent, durable one, is in the lining only. When a sheet metal lining is used in the same frame, it will make a permanent job, taking no chances of leakage. It Is likely to last indefinitely. The installation of this lining will, however, necessitate the employment of a mechanic. The difference in the cost of the lining is from $10.00 to $20.00, depending mostly on the variation in cost of mechanic's labor. When a sheet-metal lining is affixed, these eight paragraphs, Nos. 21 to 29, are not applicable. (Instead, see Plan No. 3.)
For successful results [with a roofing paper lining] see that the roofing paper is mildly warm before using. Line the floor first, as follows: cut a piece of the roofing paper (which usually is 36" wide) to the length of five feet (60") for the bottom, allowing a surplus of six inches on each side and on each end, which will serve as an underlap for the lining of the walls. Fold the bottom paper lining gently, to fit the angles at the corners. Putting this paper on the bottom is simple, except for the folding or cutting out of the corners, which must be done in such a way that it will not crack or break the paper, and also that it will make a uniform surface in the corners. This must be carefully done to assure watertight corners, and in order that the lining which is to go on the walls afterwards will have an even surface.
22. Then a hole one and one-half inches in diameter is to be cut in the bottom lining, and is not to be mended until the Mikvah lining is finished (in compliance with Sec. V, Chapter 17).
23. Having done this, cut a piece of the roofing paper to a length of twelve and a half feet. The paper being three feet wide, this makes a lining three feet high for the four walls of the Mikvah, which measure twelve lineal feet within, and leaving six inches for an overlap. Roll up this piece of roofing paper, and stand it up against a wall inside of the receptacle. Tack on to the wall the end of the paper temporarily, by means of a strip of wood; unroll the roofing paper on the walls; push it into the corners by using a square piece of wood; apply and fit the paper closely all around the four sides, and when this is done, you will find that there will be an overlap of six inches for the joint. Manage so that the ends of the paper lining, the joint, come about the middle of a wall of the Mikvah, not in a corner.
24. Before applying the roofing paper and adjusting the corners, warm up the cement, which usually comes in the roll of paper, or any other coal tar roofing cement. Apply it freely between all the overlaps, the corners, the joints, at the bottom, and the uprights. Press the ends so that they will stick and remain in place until the lining is ready for nailing. An extra application of the tar cement is advisable for the corners in the bottom, where the cracking of the paper Is probable.
25. Then cut off another piece of the roofing paper, six and a half feet in length. Split it In two, lengthwise, making each piece 18 inches in width. Use these pieces to finish the lining, lapping them over about five inches lengthwise on the paper previously applied, and six inches on each joint. Cement the overlaps and joints properly, and drive in roofing nails, dipped in roofing cement, about every three inches. It is best to use planed laths or strips of wood, screwing them up tightly, on all the joints, thus assuring tight joints.
26. You will find about one inch surplus paper at the top. This margin is intended to be bent over the edge of the boards, i.e., on the top of the walls of the frame, and tacked on to it by means of strips or planed laths, to protect the lining from breaking at the edge and to prevent the water from splashing between the paper and the boards.
27. Now, mend the hole in the lining of the bottom. Put a patch of the roofing paper over the hole, overlapping about three inches around the hole.
Note: The author directs in this instance to place the patch "over" the hole, instead of "under," as in Paragraph 54, for valid reasons of practicability, and in compliance with the intent of Section V of Chapter 17.
Bed the patch in roofing cement. Fasten the patch with roofing nails dipped in tar cement, to the floor, that is, to the floor of the room or the building, which is used as the floor of the Mikvah. It must be nailed in such a way that lifting the receptacle will be impossible without breaking or re-opening a hole in the lining; thus making it comply with the articles of Section V, Chapter 17. The receptacle can hold water only when it remains attached to the building.
28. Should one ever want to move the receptacle, the patch should be cut out, i.e., making a hole in the bottom of the Mikvah, rendering it unable to hold water. Thus, such a perforated receptacle is not classed as a "vessel" or "utensil" or "ready-made container," and it is proper to install it again as a Mikvah.
29. If the floor of the room where the Mikvah is installed is of concrete or tile, (See Paragraph 19), and nails cannot be driven into it to attach the Mikvah to the floor, then holes must be drilled in the concrete or tile, lead anchors be inserted in those holes, and screws be used in place of nails. Should it not be convenient or permissible to make many holes in the floor, at least one hole must be drilled In the concrete or tile floor, and "a hole-mending and attachment device" be applied, as hereinafter described, the size of the hole being of a dimension to receive an expansion shield for a quarter-inch lag screw. Insert the expansion shield in the hole, then fix the hole-mending and attachment device, as illustrated in the figure below, and apply same as directed. This accomplishes the purpose of closing and mending the hole in the bottom lining, and at the same time it attaches the receptacle to the floor.
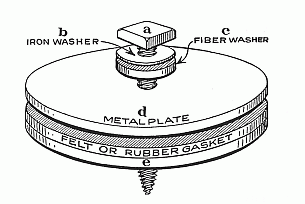
Figure 5. A hole-mending and attachment device
30. The parts of the hole-mending and attachment device are as follows:
a. Lag screw 1/4" x 2".
b. Small iron washer.
c. Small leather or fiber washer 1/8" thick, fitted tightly on the lag screw.
d. Metal plate 1/8" thick, 3 1/2" in diameter, with a 1/4" hole in the center.
e. Two tar-felt or rubber gaskets, each about 1/8" thick, same diameter as the metal plate, with a tight-fitting hole in the center.
31. Directions: Assemble this "hole-mending and attachment device" in the same order shown in the illustration, apply gasket shellac or white lead freely on the gaskets (e), between the gaskets and the plate (d), between the plate and the small fiber or leather washer (c), between the small leather washer and the iron washer (b), and on the shank and point of the screw; also on the lining around the hole in the bottom of the Mikvah. Then insert the screw in the hole of the expansion shield above referred to (Paragraph 29). Screw it in. Draw it up tightly to make the joint watertight. This will complete the attachment of the Mikvah to the ground, that is to the floor, and enable the Mikvah to hold water. The same hole-mending and attachment device may be used, if desired, also with a wooden floor. In that event no expansion shield is required. All that is needed is a small hole in the floor, a little less in size than the thickness of the lag screw (about 3/16"), to assure a tight holding.
Note: Doing this will comply with Section V, chapter 17. The receptacle can hold water only when it remains attached to the building, and by this attachment is made a part of the building. The substance stopping the water, i. e., the felt or rubber gaskets, is not classed as a utensil or commodity.
When it is desired to move the receptacle, the whole device should be taken out, and the Mikvah re-installed as directed.
The Outlet
32. Now, provide an outlet for the water. Find the hole prepared in the bottom board for the outlet (k in Figure 4), and make a hole through the lining from the inside, ready for the half-inch tank nipple (Item h of the above list of materials). Screw that nipple tightly into the sleeve or coupling (Item j); then screw the hydrant faucet (Item g) tightly into the other end of the same sleeve or coupling; then screw on loosely one of the lock-nuts (Item i) on that threaded nipple close to the sleeve or coupling; slip on a fiber washer, and then insert the end of the nipple in the prepared hole (k) from the outside. Now put the other fiber washer on the nipple from the inside of the Mikvah, and then screw the second lock-nut flush with the end of the nipple. Then screw and draw up tightly the lock-nut on the outside of the Mikvah. Shellac or white lead should be used freely on the joints and between the washers.
Note: Should it be difficult to get the right kind of fiber washers, to stand the pressure of the screw, then a string saturated with shellac or white lead, wound around and with the thread, may be used instead. This suggestion may also be applicable in Paragraphs 30-31, instead of washer (c).
When roofing paper is used, particular care should be taken in this operation not to tear it. This finishes the outlet and makes the Mikvah complete.
A Step or Ladder for a Mikvah
33. When the Mikvah is installed on the surface of the floor, a box or chair may be used on the outside as a step. For the inside, for temporary purposes, a box of such a nature that it will not hold water, and with a weight to keep it from floating, may be put into the Mikvah, as a step, for convenience.
Note: However, it will be found after a little experimenting and practice that almost any average person can, without much effort, go in and come out of a four-foot deep Mikvah without a step. It is simple to emerge just by a little swing and support of the arms on the top, one hand gripping a side and the other an end of the frame; thus not actually necessitating a step or ladder for the inside of the Mikvah.
A wooden step-ladder is not very practicable. It will float and there will be difficulty in making it fast to the bottom without damaging the lining.
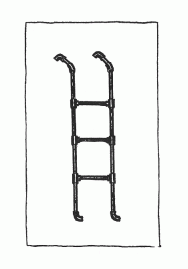
Figure 6. A metal ladder
34. For permanent use it is best to make a non-floating ladder of galvanized iron pipes, as illustrated in Figure 6. It can be assembled by any handy man. It is made of half-inch galvanized pipe nipples and fittings. It consists of eight ready-made stock nipples 12" long for the uprights, which are screwed Into T's. On the bottom ends, L's are screwed on to avoid damaging the lining. On the upper ends are 45-degree couplings, 2" nipples and L's; thus forming a hook, holding on to the frame. Three nipples 12" long screwed horizontally into the T's will form three rungs. Right and left thread nipples may be used for the rungs, or if these are not available) union connections may be made use of. When screwed tightly, a durable, substantial, non-floating ladder is formed. The specification of this ladder is for a Mikvah four feet deep. The ladder is longer, so it will rest a little at an angle. The length of the upright nipples may be changed to suit different depths.
35. In a permanent Mikvah structure, one end may be built in steps. This will, however, necessitate calculation of the cubic space in the Mikvah, according to each step.
Ascertaining the Measurements
36. When construction of the Mikvah is completed, measure again the length and width inside the space of the Mikvah, to make certain that it has not lost any fraction of space from the dimensions Intended to make the required quantity of water for the Mikvah, by reason of slightly inaccurate measuring, or mechanical imperfections.
37. If the measurements are found to be correct, then measure inside and designate the height, whatever was calculated for the depth of the water, in proportion to the width and the length, to make up the 24 cubic feet. Add a fraction, and make a permanent mark at that point as a water-line, the point to which the water must reach in order to make the required amount.
38. Should it be found that the inside of the Mikvah does not tally within a fraction with the measurements planned, then that equivalent proportion lost in length, width, corners, or angle space, etc., and a fraction over, should be added to the height of the water-line, and a permanent mark be made at that higher point.
39. When anything Is put into the Mikvah, such as a step or ladder, care should be taken to mark the water-line higher, according to the rise of the water when the object is sunk, and to make sure that the net volume of water required for the Mikvah is there.
Filling the Mikvah
40. For filling the Mikvah with water, use a rubber hose. Connect one end of the hose to the nearest hydrant bib faucet of hot or cold water in the room or building, the other end of the hose being placed in the Mikvah. Any nozzle at the end of the hose must be removed. Care should be taken that the end of the hose does not twist and jump out of the Mikvah when the water is turned on, thus causing splashing in the room.
41. The hose must lie absolutely by itself when the water is let into the Mikvah. Under no condition should a person hold or support the hose. Should it happen that any water to the amount of three lugim, that is, one quart (U. S. standard measurement), comes into the Mikvah by the assistance, or through the efforts, of a person holding the hose, before the Mikvah contains the full required quantity of forty se'ahs (24 cu. ft), that water disqualifies all the water in the Mikvah, and the Mikvah must be drained, emptied of all the water, and refilled, as directed in Chapter 17, "Fundamental Rules of Mikvah," Section II, Paragraph 4. Therefore, as a matter of precaution, it is best to affix another female coupling on the other end of the hose, and to connect it to the outlet faucet of the Mikvah, thereby avoiding the probability of human interference, and also splashing. Care must be taken that the Mikvah be always filled or refilled to the water-line mark, as referred to above. The cost of forty se'ahs (24 cu. ft.) of water required for Mikvah is from five to ten cents, depending on the volume of water consumed in the house from the water supply.
Draining the Mikvah
42. When it is desired to let the water out, drain it through the outlet hydrant (k, Figure 4), provide it with a hose leading to any convenient lower level, or to a toilet, basin) sink, or tub, located on a lower level. To aid in draining, it is best to install the Mikvah on a floor above the ground floor.
43. Should it be necessary to install the Mikvah on the ground floor, or in a basement, or where the tenant has no privilege of draining the water to a lower level, then the water may be let out through the "clean-out" plug usually provided on the lower level of the drain or sewer pipe. And if it Is permitted, a hole may be drilled in any of the drain pipes close to the floor - or below the level of the Mikvah - to receive the hose, that is, the outlet of the Mikvah. A plug can be fitted so that the hole will not interfere with the regular draining system. When there is no drain pipe accessible to the Mikvah, the water may be drained to any plumbing fixture on that floor level. This will release the water in the Mikvah at least up to the height of that fixture. The rest of the water would have to be dipped out with a bucket.
44. By the method of syphoning, the water can be drained to a plumbing fixture, the bottom of which is close to the floor, as a toilet or bathtub. All the water of the Mikvah would then be carried by suction to the lower level of the inside of the bathtub, or toilet bowl, which are usually only from four to six Inches above the floor. Then the last four or six inches of water within the Mikvah would have to be drained into a shallow vessel, and the rest of it dipped or scooped out by a bucket.
45. When the Mikvah is emptied by a bucket or other utensil, care should be taken that all the water is removed therefrom, lest the remaining water become disqualified by the dipping with the utensil, and that water in turn disqualify the water coming In thereafter.
46. For occasional and temporary use a Mikvah can also be lined with waterproof canvas. For instance, a piece of canvas, made up in a size of ten feet by twelve feet, would fold and fit exactly into the described frame, measuring 48" x 24" x 48". Smaller pieces of canvas can be used by joining the pieces, that is, by arranging them inside the frame so that the ends lap over, and then using a wooden strip over the joints, drawing them up tightly with screws. This will in a measure make the Mikvah hold water, though it is not exactly waterproof. Some water is likely to seep through the canvas, particularly when the weight of the water is exerted, expanding the weave. Such a Mikvah, with mere seepage, is proper (see Paragraph 1, Section II, Chapter 17, "Fundamental Rules of Mikvah") provided the water does not run below the required volume. This Mikvah may be constructed where the seepage of the water will not do any damage, and may be made use of in case of necessity, as in traveling or camping.
47. It must be remembered, however, that a hole equivalent in size to one and one-half inches in diameter at the bottom of the lining must be made before the lining is completed, and a patch be fixed over the hole in the same manner as explained in Paragraph 27, this chapter; or when applicable, the mending and attachment device, as described above in Paragraph 30, Figure 5, may be made use of.
Moving and Re-installing the Mikvah
48. Should it be desired to move the Mikvah receptacle, this can be accomplished with hardly any more difficulty than moving other household furniture, and it is never more of a problem than moving a piano. Most doors are more than thirty inches wide, permitting the above described Mikvah to pass through. Or, If it is expected to be moved, other narrower (but longer) designs of Mikvahs may be adopted; thus assuring passage through almost any door.
49. When it is desired to move a Mikvah whose lining is made of roofing paper or canvas, as above referred to, and which is directly nailed to the floor, see Paragraph 28. When the lining is made of galvanized sheet metal, and the patch is attached to the floor beneath the Mikvah, as hereinafter described in Paragraph 54, and it is desired to move the Mikvah, this may be done in the manner described in Paragraph 55.
50. When the Mikvah is disguised in furniture, hereinafter referred to in Paragraph 60, the mending and attachment of same will, as a rule, necessitate the use of the "attachment device" (which device is applicable to any of these Mikvahs) as illustrated in Figure 5, and described in Paragraphs 30 and 31, the re-installation may be accomplished as stated there.
51. When the receptacle is moved, a diagonal brace should be nailed on the top to prevent wiggling of the frame, thereby avoiding the possibility of breaking the lining; or permanent short diagonal braces may be fixed on one end of the frame.
Plan Number 3 - A permanent and durable Mikvah with galvanized sheet-metal lining
52. The next improvement in the installation of a Mikvah, over Plan Number 1 - the one costing less than $5.00 - may be in the use of better lumber, finishing it with stain or paint to harmonize with the color and finish of the room. The main and most practicable improvement on the low-priced Mikvah is to insert a galvanized sheet-metal lining (gauge 22 or 24), which we recommend. This makes the construction permanent and durable, though the initial cost is a little more; and there will be no chance of leakage. (See the note in Paragraph 21.) The principal plans for construction, particularly those having the sides of the Mikvah held by the end-panels, referred to in Paragraphs 12 and 13, and as illustrated in Figure 3, hold good in almost any case, and can hardly be improved upon.
53. When sheet-metal lining is fixed, it is best not to complete the lining, including the bottom, before It is placed in position. When convenient, it is more in compliance with the regulations that the bottom be soldered in after the wall lining is permanently fixed In the Mikvah. Should this prove difficult, the whole lining may be made ready outside of the Mikvah. In any event, a hole equivalent to one and one-half inches in diameter must be made in the bottom of the lining before it is inserted in the frame. This hole is to be mended when the lining is set and attached to the frame, as in Paragraph 22.
54. To mend the hole, put a piece of galvanized sheet metal, a few inches larger than the hole, on the floor beneath the bottom lining. Fasten this piece permanently to the floor with nails or screws. Then insert the bottom lining, the hole being over the piece of sheet metal; then solder the hole all around to that piece of sheet-metal already attached to the floor. It must bedone in such a way that the Mikvah cannot be lifted from the floor without loosening the soldering, and reopening the hole. This mending of the hole in this way will at the same time form the required attachment of the Mikvah receptacle to the ground, that is, to the floor. This must be done in compliance with the regulations of Mikvah (Section V, in Chapter 17, "Fundamental Rules of Mikvah") referred to in Paragraph 27, this chapter. In case the floor is of concrete or tile, refer to Paragraphs 19 and 29, this chapter. The "hole-mending and attachment device," mentioned in Paragraphs 30 and 31, Figure 5, may be used.
55. Should It be desired to move the Mikvah, the soldering around the hole may be loosened (or the mending and attachment device taken out) and the Mikvah lifted up with the hole open; thus making it proper to install it again. Another piece of sheet metal is to be affixed to the new floor, and the hole mended in the same manner as before.
56. A galvanized sheet-metal Mikvah can also be made without a wooden frame by merely using a little heavier grade (gauge) of sheet metal (18 or 20 instead of 22 or 24), and reinforcing the bottom, top, and' center with rounded or angle strips; thus making the Mikvah more practicable, lighter in weight, and easier to move than with a wooden frame. Ornamental (stock) trimming may be affixed to the Mikvah, as a disguise, to make it appear as a piece of furniture, as mentioned in Plan Number 4 below.
57. When the galvanized sheet-metal lining is fitted for a Mikvah which is constructed with an outlet directly connected to the drain pipes, as mentioned hereinafter in Plan Number 7, then the hole made in the bottom of the lining to fit that connection is sufficient. When connected, it accomplishes the purpose of the abovereferred-to articles. (See Paragraph 4, Section V, Chapter 17, "Fundamental Rules of Mikvah.")
58. These plans, specifications, materials and dimensions are mostly suggestions. Should one prefer to construct a Mikvah in another manner, or to employ a designer or mechanic, he may use his own judgment, provided the strength, the necessary resistance to the weight and pressure of the water in the Mikvah, is considered, and provided also, of course, that the proportionate size for the minimum volume of water, twenty-four cubic feet, with about twelve inches allowance on top of the waterline for the rise, overflow and splash, are provided for; and that the fundamental regulations, referred to in Paragraph 6, this chapter, are complied with.
59. Galvanized sheet-metal lining for Mikvahs has proved most satisfactory, practicable and durable. From our own experience, we recommend the galvanized lining for a Mikvah whenever It is applicable, even in cases where it is intended that the inside of the Mikvah be decorated in a more artistic manner. This may be done on the surface of the galvanized lining.
Plan Number 4 - A Mikvah disguised as furniture
60. The following illustrations, Figures 7, 8 and 9, show how a Mikvah can be constructed in the disguise of furniture, and moved like other furniture, for the convenience of a tenant family. In this case the Mikvah is equipped with a galvanized sheet-metal lining, or is made entirely out of sheet-metal (Paragraph 56) having a hole one and one-half inches in diameter in the bottom, and "a hole-mending and attachment device," as illustrated in Figure 5, and described in Paragraphs 30 and 31. In order that the Mikvah may easily pass through a doorway, a suitable dimension may be selected.
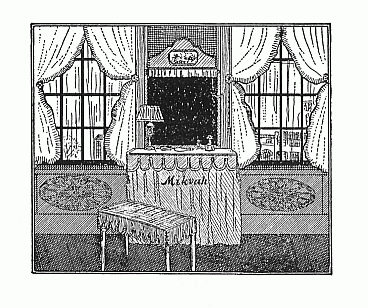
Figure 7. The drawing above represents a simply constructed Mikvah,
as in Plan 3, having a fitted top. Covers and drapes may be used on the
outside, giving it an ornamental finish. It may be made to appear as a
dressing table, or a folding bed. It may be disguised as a wardrobe,
a cedar chest, or a cabinet, etc.
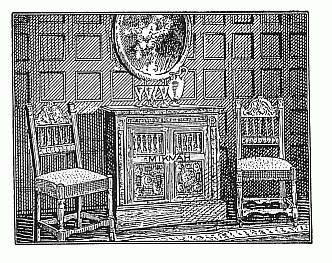
Figure 8. A Mikvah disguised as a buffet, made
in such a way that it appears to rest on legs.
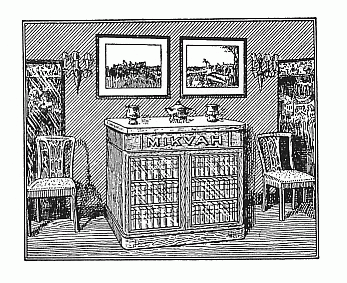
Figure 9. This Mikvah has been made to appear
as a bookcase.
Plan Number 5 - A collapsible, flexible, folding Mikveh
61. The author has experimented with and invented several kinds of collapsible or folding Mikvahs for the convenience of Jews who live in crowded quarters, as is usual in big cities, or for those who are tenants and are likely to change their residences often. The latest and most improved folding Mikvah consists of a flexible material. It rises and stands securely by itself, with no frame, so constructed that it cannot be tipped over. It unfolds and rises by itself when the water is let in; it collapses and partially folds automatically when drained. It may be folded into a small bundle to a size of about fifteen by fifteen by twelve inches.
62. This Mikvah is attached to the floor by "a hole-mending and attachment device," shown in Figure 5, Paragraph 30, this chapter. Its use is on the same principle as disappearing or built-in furniture, such as a folding bed, davenport, wall-bed, or combination kitchen table, cabinet, and breakfast nook. It can remain attached to the floor under a couch or bed, unseen. When desired) it can be utilized as, (1) a Mikvah, (2) a plunge, or (3) a shower bath, by merely moving aside the couch or bed, and turning on the water. A hydrant bib faucet is affixed at the bottom, and a rubber hose is connected to it from any water faucet in the house, when the Mikvah is to be filled. The water is shut off when it reaches the water-line which indicates the required quantity of forty se'ahs (twenty-four cubic feet). This same faucet of the Mikvah is also used as an outlet, draining the water to the desired place by means of a hose.
63. The author considers it impracticable to give the full description of the construction of this Mikvah in this book, as it would be rather difficult and expensive for an individual to make a single one. The author would have made up a supply ready for the demand, had that not necessitated a quantity production on a business basis, leading eventually to the establishment of a business and a commercializing of the Mikvah, which would conflict with his principles (of not commercializing anything pertaining to the cause of Judaism). However, the author prays that some observant Jews who are interested in the promotion of the cause of Judaism may combine the virtue of developing such a Mikvah with a commercial enterprise. It is reasonable to expect that, considering its three-fold usefulness, its saving in space, and its adaptability, a commodity of this kind would be in large demand. The author would be delighted to assist such an undertaking, help to carry it out, and have the interests of the investors protected by patents.
Plan Number 6 - Utilizing closet space for Mikvah
64. The following illustrations show how any available space in the house, even space that Is otherwise not very useful, can be utilized for a Mikvah in addition to its regular use, as, for instance, the lower part of a closet, a corner under a stairway, etc., no matter whether the space is perpendicularly straight, square, angular, rectangular or triangular in shape; thereby losing hardly any space.
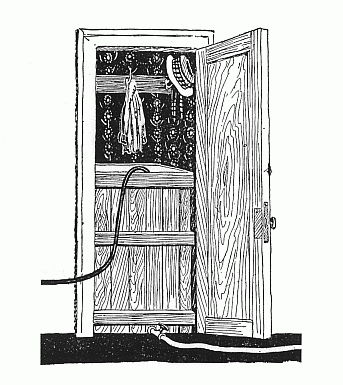
Figure 10. This represents a Mikvah constructed in a closet.
The closet space does not necessarily lose its usefulness, but
such a Mikvah is very useful and inconspicuous.
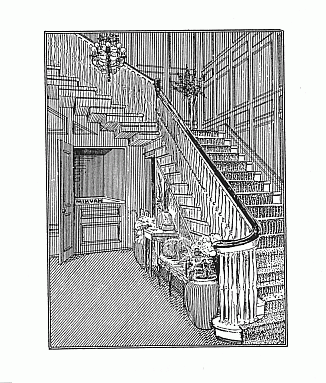
Figure 11. This represents a Mikvah constructed under
a stairway in a space of little use.
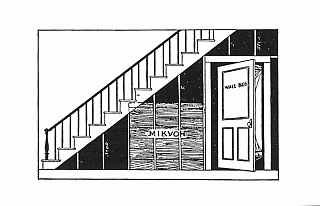
Figure 12. This represents a Mikvah constructed in a
wall-bed closet, which space is of little or no value for
other use. Neverhteless, it is very convenient for this
purpose, the Mikvah being easily accessible, yet concealed.
65. All the above plans and suggestions are for Mikvahs constructed in houses already built, not necessitating alteration or remodeling of the building in any way, and providing that the Mikvah can be moved when needed. But if one does not expect the Mikvah to be moved, he may avail himself of the following suggestions.
Plan Number 7 - Permanent, ornamented Mikvahs
66. The illustration below is a suggestion for the construction of a permanent Mikvah. This, also, can be done in a house already built. The frame of the Mikvah may be of wood, plastered on the outside with cement, on which a tile or stone design may be made, or real tile may be affixed. The inside, the lining, may be of galvanized sheet-metal. It can be finished with enamel paint above the water-line. (Paint is not practicable under water unless it is in the nature of baked enamel.)
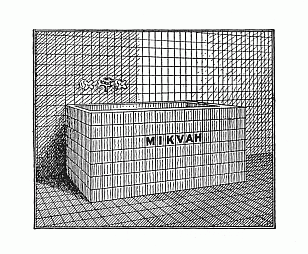
Figure 13. A tile Mikvah
67. The Mikvah may be plastered inside also with cement and lined with marble, glazed porcelain tile, opaque glass, plate or mirror glass; bedded in the cement. Such construction may be carried out very artistically by using difiFerent colored inlaid tile in the form of panels and borders, with an offset as a waterline, to indicate the required quantity of forty se'ahs (twenty-four cubic feet; see Paragraphs 37, 38 and 39, this chapter). If one is willing to alter the floor of the room so that a part of the Mikvah is below the level of the floor, as In Plan No. 8, it may appear more in harmony with the lines of the room.
68. When constructing a Mikvah of concrete or brick, it is best to line it with such materials as those above (Paragraphs 66 and 67), otherwise it will be found difficult to make the Mikvah water or damp proof. However, a slight seepage of water will not Interfere with the laws governing Mikvah, provided the water does not run down below the minimum required volume.
69. A Mikvah plastered with cement or made of concrete or brick may also be constructed on the floor. In this case it may be advisable to consult an authority on building to ascertain whether the weight is excessive and whether a support is needed beneath the floor. The different Mikvahs mentioned before Plan No. 7 do not ordinarily require a support for the floor, as the margin of safety, the stress, of the ordinary building is usually more than the required support for such a Mikvah, the weight of which, including the water, will approximate only about eighteen hundred pounds. It is understood that any Mikvah so constructed that it is permanently built in or/and of a stationary nature (other than those built semi-temporarily and likely to he moved, as referred to in Paragraph 17, this chapter), may be provided with an independent floor, if so desired. The inlet and outlet for the water of these permanent Mikvahs may be permanently connected to the water and sewer pipes.
Plan Number 8 - Suggestions for more permanent Mikvahs
70. The following illustrations suggest permanent Mikvahs installed in a house already built, but the floor may be altered to suit the convenience of the Mikvah. In such instances, the Mikvah may be constructed in the most accessible and convenient room, as In the living room (Figure 14), the dressing room (Figure 15), or the bedroom (Figure 16). This construction may be made in such a way that the Mikvah is the height of a seat, about sixteen inches above the floor, so that it can be made to appear as a window-seat, couch or lounge; or it may be built the height of a dressing table, with, of course, a top fitted to the Mikvah.
71. The Mikvah may also be constructed below the surface of the floor, so that the top of the Mikvah is even with the floor. The cover, fitted to the top of the Mikvah, serves as the floor of the room; thus basement or cellar space may be utilized Instead of the floor space in the room) and the Mikvah is not visible.
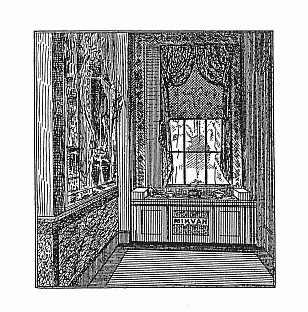
Figure 14. A Mikvah harmoniously arranged in a living room.
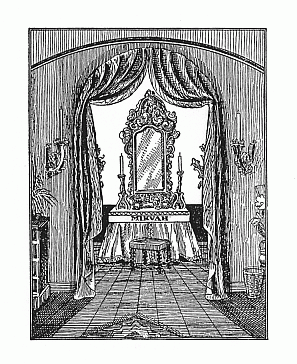
Figure 15. A Mikvah artistically installed in a lady's private dressing room, or boudoir, etc.
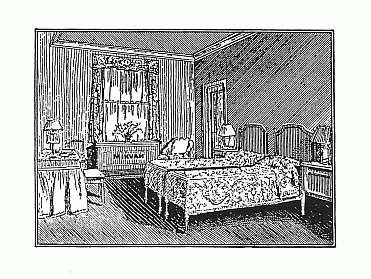
Figure 16. A Mikvah installed in the bedroom for comfort and convenience.
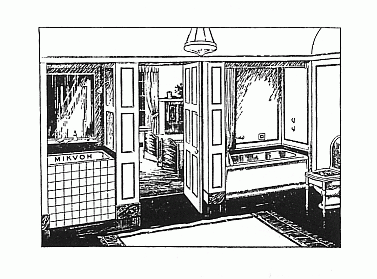
Figure 17. A Mikvah harmoniously arranged in a living room.
Except for the paragraph shown below, below we will skip the remainder of this chapter, in which Rabbi Miller goes on to discuss some of his ideas for public mikvaot. We end with the final paragraph of Chapter 19. It is interesting as an indication of the importance that Rabbi Miller placed on mikveh:
74. For the purpose of installing a Mikvah in a community, or a private home, it is permissible, and even commendable, that the Holy Scroll be sold to raise funds therefor, if no other funds can be obtained. It is a reflection upon, an insult and blasphemy to, the Torah, for the Torah to be found in a community where there is no Mikvah.
Although the rabbi's tastes in interior decorating probably were retro even for his day (nearly 100 years ago!) the basic ideas laid out above are sound. The two chapters we have included here make a convincing case for using ordinary tapwater in a mikveh, and show us how we can build a no-frills immersion pool that avoids the halachic prohibition against vessels.
From here you can move up one level.